
Introduction
It may be a fun and demanding experience to draw animals, particularly cats. Cats are beautiful creatures to depict in art because of their expressive eyes, smooth fur, and elegant movements. Learning how to draw cats well can help artists of all skill levels take their work to the next level. Here we’ll have a look at the “drawing:a4z_-ymtkr8= Cat” method, which is an organized way to drawing cats that uses intricate techniques and geometric shapes.
What is “Drawing:a4z_-ymtkr8= Cat”?
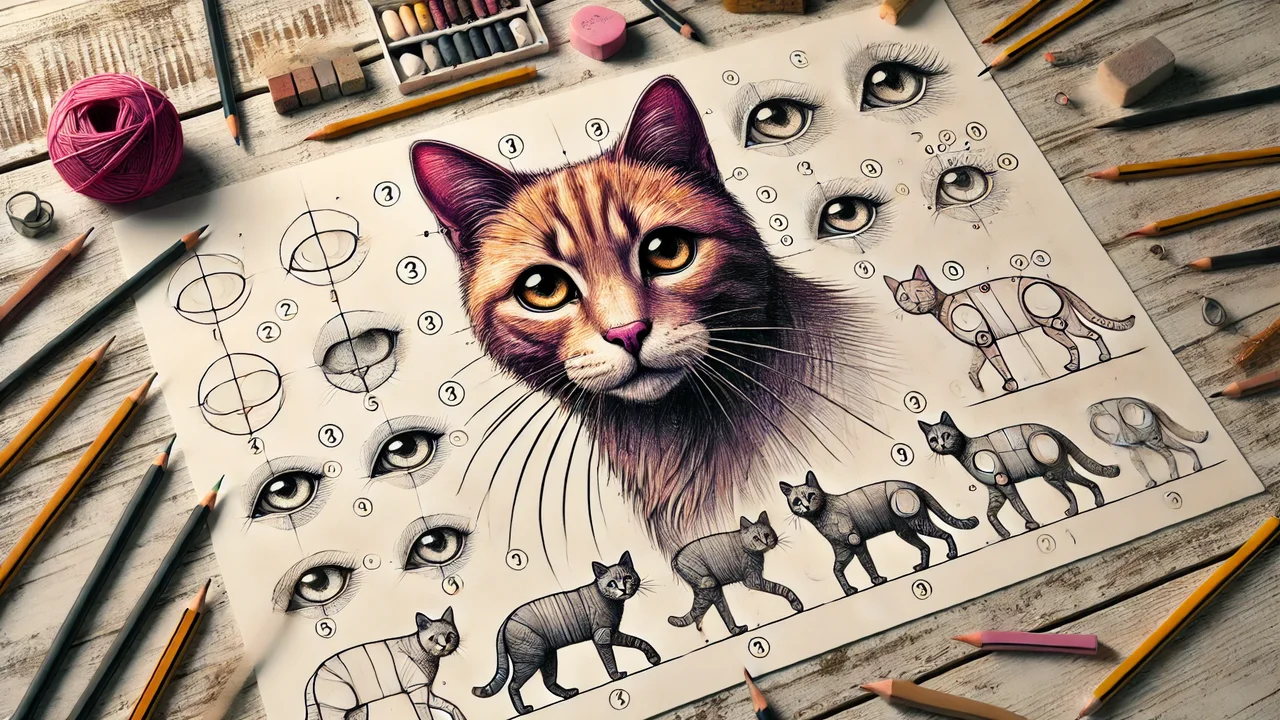
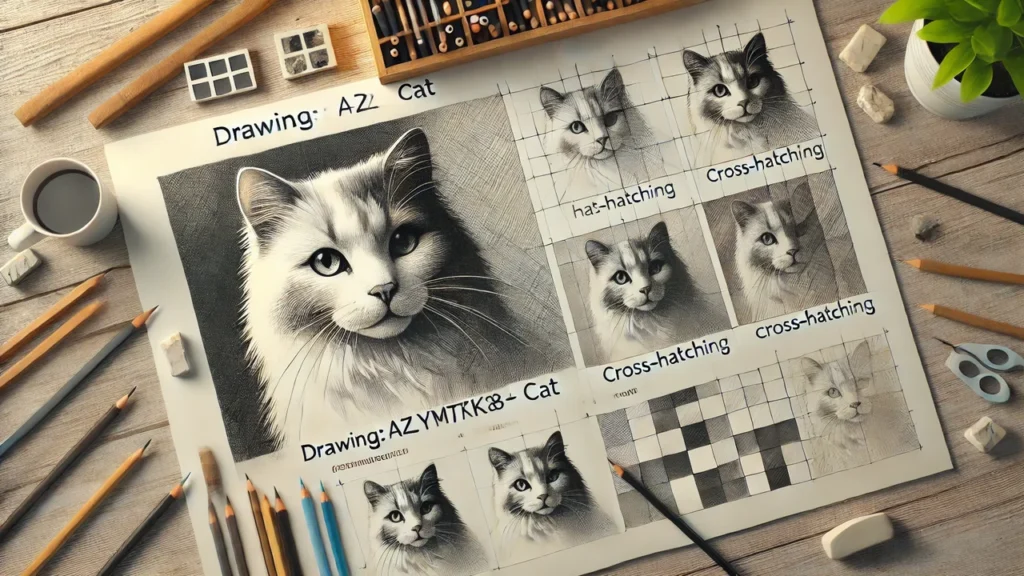
The “Drawing:a4z_-ymtkr8= cat” method is a systematic way to draw cats that starts with simple geometric shapes and gets more complicated as you go. Cat anatomical diagrams are often simplified into basic shapes like circles, ovals, and lines to help artists keep their proportions and symmetry in the final product. Shade methods like blending and cross-hatching are also heavily emphasized, along with lighting, realistic features (such fur and whiskers), and texture.
Why Choose the “Drawing:a4z_-ymtkr8= Cat” Method?
All painters, regardless of experience, can benefit from the “Drawing:a4z_-ymtkr8= Cat” technique. Those just starting out can work on basic shapes before moving on to more complicated ones, while those with more experience can hone their details and try out new designs. This method is useful for making lively and realistic cat illustrations, and it also makes it easier to keep proportions straight.
Breaking Down the Cat’s Anatomy
Accurate and balanced cat drawings require knowledge of the animal’s anatomy. We’ll go more into the ways in which geometric forms can help you understand the cat’s anatomy.
Head and Face Structure
When drawing a cat, the head is a crucial part of the design. To get a feel for the proportions and size of the skull, sketch out a basic oval or circle first.
Making Use of Ovals and Circles for the Crown
To start, draw an oval to stand in for the head. Here you can find the fundamental blueprint for your project. A smaller oval can then be added to cover the space around the snout. Using straight lines as guides, you may verify that the eyes, ears, and nose are put symmetrically.
Placing the Eyes Symmetrically
Big, expressive eyes are the most striking feature of a cat’s face. Make sure the two big circles you’re going to create for the eyes are equally spaced from the center guiding line. Since the eyes are frequently the most expressive feature of a cat’s face, symmetry is crucial when trying to capture its emotion.
Adding the Ears and Nose
Two triangles perched above the head can stand in for the ears. Cats’ ear positions can greatly affect the overall atmosphere of a picture, so be sure to pay attention to this detail. Located in the middle of the face, somewhat below the eyes, the nose is often a little triangle.
Creating Expressive Whiskers
One distinguishing trait of cats is their whiskers. To the drawing, they give the impression of depth and space. Make sure they extend symmetrically from the area around the nose as you sketch them with swift, assured strokes.
Body and Limbs
After the head is positioned, the next step is to attach the body and limbs. The long, lean bodies of cats allow them great speed and dexterity.
Drawing the Torso with Geometric Shapes
Create an oval shape to represent the body. Positioned just behind the skull, this should be bigger than it. The cat’s sturdy oval frame serves to highlight its proportions and pose.
Positioning the Limbs with Lines
The legs of a cat are long and elegant. The position of the cat dictates whether the limbs should be drawn using straight or curved lines. When a cat sits, for instance, its back legs will be bowed and closer to its torso, and its front legs will be somewhat extended in front.
Defining the Paws
One option is to depict the paws as tiny circles or ovals attached to the ends of the limbs. You should know that cats have very little paws compared to their overall size.
Tail and Fur Details
And last but not least, the tail! The tail not only helps to balance the cat’s body but also gives you more room to express emotion when you draw it.
Drawing the Tail as a Long Curve
From the back of the torso, the tail can be represented as a long curve. A cat’s expression can be read by its tail curvature; an upright tail shows attentiveness, while a drooping or bent tail suggests playfulness or relaxation.
Adding Fur Texture with Short Strokes
Use small, overlapping strokes to depict the fur of the cat for a more lifelike drawing. In particular, while brushing the cat’s face, tail, and limbs, the length and direction of your strokes should mirror the fur’s natural movement.
Mastering Shading and Lighting Techniques

Mastering shading and lighting techniques is vital for giving your cat drawing depth and reality. Light and shadow work together to give the impression of fur texture, and the cat’s three-dimensional shape is brought to life by the former.
Cross-Hatching for Fur Texture
A typical shading method is cross-hatching, which entails drawing crossing lines to produce depth and shadow. This technique is ideal for recreating the look and feel of feline fur, especially in denser regions such as the neck and chest.
Layering Cross-Hatching
Create the illusion of shadows fur by drawing two sets of lines at various angles; first, light, evenly spaced lines in one direction. You may add depth to your design by varying the pressure with which you brush the paper, making some sections lighter and others darker.
Blending Shadows for Smooth Fur
When you want to make a seamless change from light to dark, blending is another great shading technique to use. To achieve a more realistic fur effect, soften the pencil lines by smudging them with a blending tool or your finger.
Building Depth with Multiple Layers
Layers of shade can be applied to areas of thicker fur, such as the tail and chest. To get a sense of depth, sketch lightly with the pencil and then add darker shades.
Exploring Digital Cat Art Techniques
You can still use the “Drawing = cat” option if you prefer working digitally. You can create photorealistic lighting and fur effects with digital art tools such as brushes, textures, and layers.
Using Layers to Separate Elements
In digital art, the ability to employ layers is among the most significant benefits. The various parts of a cat, like its head, body, and tail, can be made into their own distinct layers. You can make changes here without worrying about them influencing the rest of the drawing.
Custom Brushes for Fur Texture
Adobe Photoshop and Procreate are only two of many digital art applications that have fur-like brushes available. Using these brushes might help you save time while improving the realism of your drawings. To get the look you want, try using various brush settings.
Lighting and Shading in Digital Art
Managing the brightness and shade is also made easy using digital tools. For seamless light-to-shadow transitions, try using a soft brush and adjusting the opacity to your liking.
Refining Your Cat Drawing
It is time to apply the finishing touches to your drawing after you have established the fundamental forms, fur texture, and shading. If you want your drawing to get from rough draft to finished illustration, this is the step for you.
Adding the Final Details
Be careful to study the cat’s features, especially its whiskers, eyes, and nose. Incorporating these elements into your drawing can give it more life and character.
Creating a Sense of Movement
If your feline friend is playing or bouncing about in your drawing, make sure to utilize dynamic lines to show movement. One can perceive movement depending on the orientation of the fur, the shape of the tail, and the placement of the limbs.
Enhancing Cat Drawings with Shading Techniques
Particularly when depicting feline subjects, shading is essential for giving drawings a sense of depth and reality. The fur’s texture, the figure’s contours, and the light source may all be brought to light with the correct shading approach.
Cross-Hatching for Layered Shadows
A multi-directional shading technique, cross-hatching involves drawing lines in several directions to create darker areas. This is a great way to draw cats with plenty of fur or with shaded areas beneath the belly, chin, and tail. To adjust the darkness of the shadows, play about with the line spacing.
Blending for Smooth Fur Transitions
To get the subtle shading that one sees in feline fur, one can blend colors using a blending stump or delicate pencils. Lighten your touch on the emphasized areas and add darker shades where shadows fall, like beneath the paws or around the ears.
Using Stippling for Fur Texture
Instead of lines, stippling uses dots to create texture. This is a great way to add delicate fur features to a cat’s face, particularly in the areas around the eyes, mouth, and nose. You may add depth and volume by adjusting the distance between the dots; doing so makes the shading darker.
Drawing Realistic Cat Eyes
Because they convey so much emotion, the eyes are usually the main attraction in a cat artwork. If you can capture their likeness accurately, your illustration will stand out more.
Creating Reflections in the Eyes
The shiny surfaces of a cat’s eyes are well-known. For this effect, you need to depict reflections by leaving small portions of the eye unshaded. The result will be eyes that look both shiny and realistic.
Adding Depth to the Iris
Create the illusion of depth and texture in the iris by blending and cross-hatching. Begin by using lighter strokes close to the pupil, then gradually darken the outer edges to give the illusion of depth.
Also Read: Wallpaper:hq2hr3icmae= cat: Captivating Cat Wallpaper
Frequently Asked Questions (FAQs)
How do I start drawing cats using geometric shapes?
Begin by breaking the cat’s body into basic shapes like circles and ovals for the head, body, and limbs. This helps maintain proportion and balance as you add details.
What is the best technique for adding fur texture to a cat drawing?
Cross-hatching and blending are two effective techniques for creating fur texture. You can vary the direction and pressure of your strokes to simulate different fur lengths.
How can I achieve symmetry when drawing a cat’s face?
Use guidelines to divide the face into equal parts, and place the eyes, nose, and ears symmetrically along these lines. This ensures balance and accuracy.
What digital tools are useful for drawing cats?
Digital programs like Procreate and Adobe Photoshop offer custom brushes for fur texture, layers for easy adjustments, and tools for shading and lighting.
How do I refine my cat drawing from a basic sketch to a detailed illustration?
After sketching the basic shapes, focus on refining the details, such as the fur, eyes, and whiskers. Add shading and lighting to create depth and realism.
Conclusion
For artists looking to make realistic depictions of felines, the “drawing:a4z_-ymtkr8= cat” method offers a simple yet effective toolkit. Drawing with proportion, symmetry, and balance becomes second nature when artists begin with simple geometric forms and work their way up to more complex ones. Using digital tools, you may further refine techniques like cross-hatching, blending, and stippling, which provide depth, texture, and shadow, further enhancing the realism.

Ruby Stauffer is a prominent technology blogger known for her insightful analysis and in-depth reviews of the latest tech trends and gadgets. Her blog has become a go-to resource for tech enthusiasts seeking reliable information and expert opinions on the ever-evolving world of technology.